文件系统 资源虚拟化
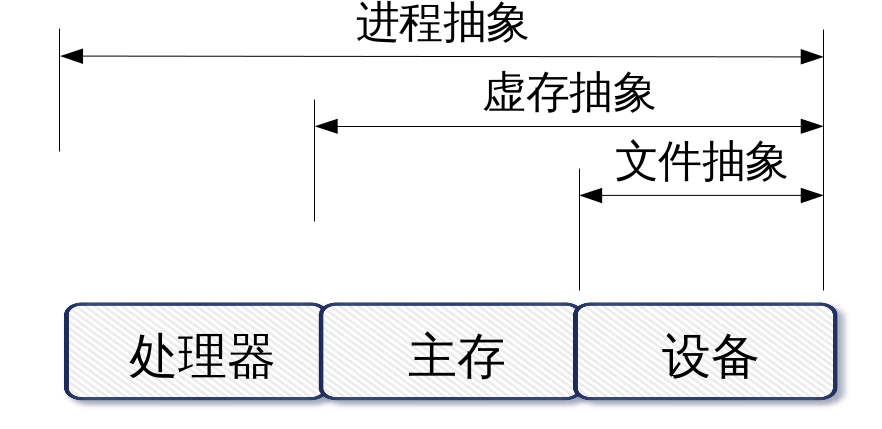
Linux操作系统内核由6个部分组成:
进程调度与管理
主存管理和虚存管理
VFS和文件管理
设备管理
网络接口和通信
用来实现资源抽象
资源分配和资源共享等功能。
文件系统的概念 操作系统中负责管理和存储文件信息的软件机构称为文件管理系统,简称文件系统。
从系统角度来看,文件系统是对文件存储设备的空间进行组织和分配,负责文件存储并对存入的文件进行保护和检索的系统。
具体地说,它负责为用户建立文件,存入、读出、修改、转储文件,控制文件的存取,当用户不再使用时撤销文件等。
文件系统的类型 查看系统支持的文件系统ls /lib/modules/$(uname -r)/kernel/fs
系统目前已加载到内存中支持的文件系统more /proc/filesystems
文件系统的结构 索引式文件系统(indexed allocation)
文件系统内的信息主要有:
superblock:记录filesystem的整体信息,包括 inode/block的总量、使用量、剩余量, 以及文件系统的格式等;
inode:记录文件属性,一个文件占一个inode,同时记录该文件数据所在的block 号码;
block:实际记录文件的内容,若档案太大时,会占用多个 block
文件系统的区别 rhel6[root@rhel6 ~]# mkfs mkfs mkfs.ext2 mkfs.ext4 mkfs.msdos mkfs.cramfs mkfs.ext3 mkfs.ext4dev mkfs.vfat
[root@rhel7 ~]# mkfs
mkfs         mkfs.cramfs  mkfs.ext3    mkfs.fat     mkfs.msdos   mkfs.xfs
mkfs.btrfs   mkfs.ext2    mkfs.ext4    mkfs.minix   mkfs.vfat
EXT4 Linux kernel 自 2.6.28 开始正式支持新的文件系统 Ext4。Ext4 是 Ext3 的改进版,修改了 Ext3 中部分重要的数据结构,而不仅仅像 Ext3 对 Ext2 那样,只是增加了一个日志功能而已。Ext4 可以提供更佳的性能和可靠性,还有更为丰富的功能,不向下兼容ext3。
XFS 针对海量小文件的存储及超大文件的存储有一些有时,但 EXT 系统相对稳定。XFS 是 Silicon Graphics,Inc. 于 90 年代初开发的文件系统。它至今仍作为 SGI 基于 IRIX 的产品(从工作站到超级计算机)的底层文件系统来使用。现在,XFS 也可以用于 Linux。XFS 的 Linux 版的到来是激动人心的,首先因为它为 Linux 社区提供了一种健壮的、优秀的以及功能丰富的文件系统,并且这种文件系统所具有的可伸缩性能够满足最苛刻的存储需求。
文件系统的简单操作
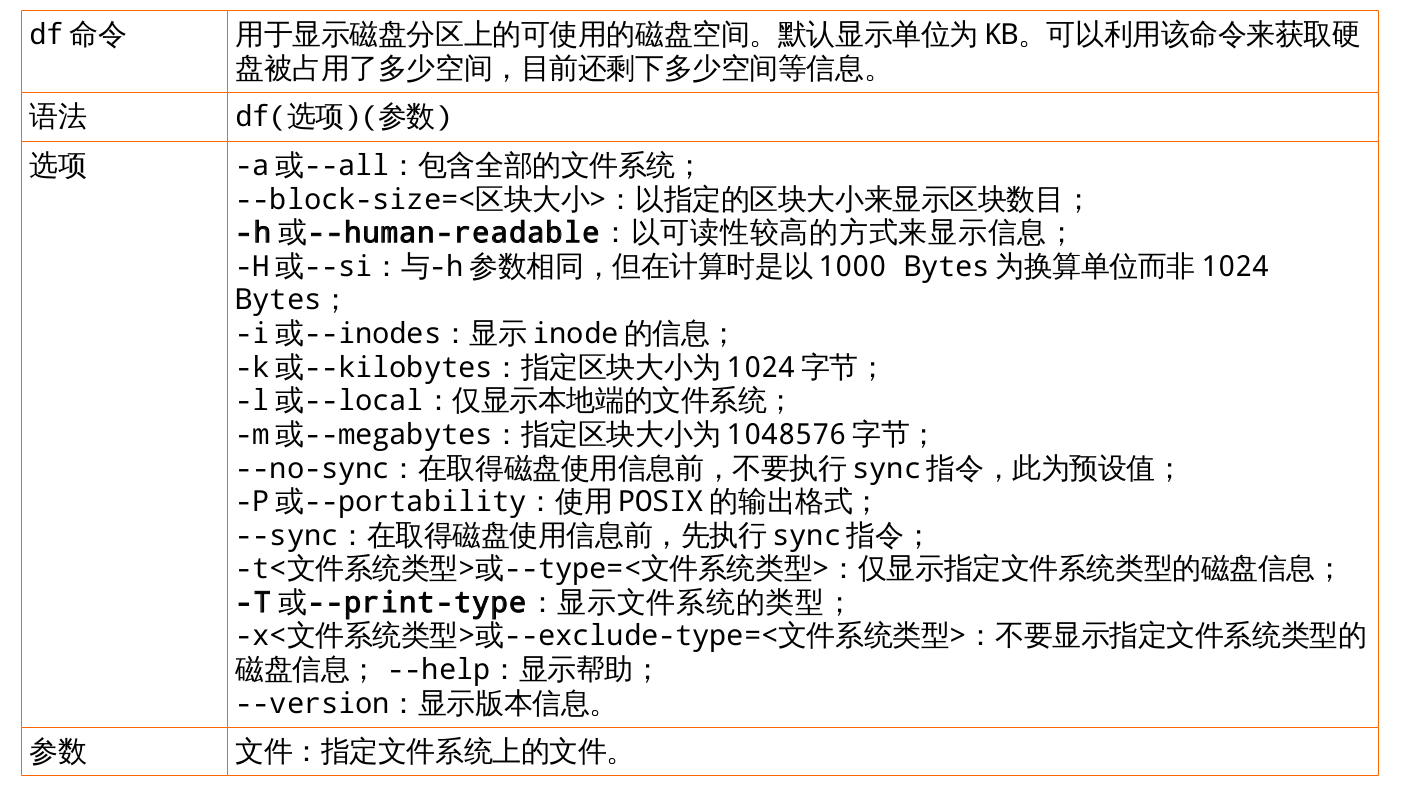
df
实例:
使用-h选项以KB以上的单位来显示,可读性高[# 3 Filesystem Size Used Avail Use% Mounted on /dev/mapper/vg_rhel6-LogVol01 17G 3.0G 13G 19% / tmpfs 499M 72K 499M 1% /dev/shm /dev/vda1 477M 58M 390M 13% /boot /dev/mapper/vg_rhel6-LogVol00 380M 2.3M 354M 1% /home
查看全部文件系统:[# 4 Filesystem 1K-blocks Used Available Use% Mounted on /dev/mapper/vg_rhel6-LogVol01 17535796 3127044 13494936 19% / proc 0 0 0 - /proc sysfs 0 0 0 - /sys devpts 0 0 0 - /dev/pts tmpfs 510368 72 510296 1% /dev/shm /dev/vda1 487652 58631 399325 13% /boot /dev/mapper/vg_rhel6-LogVol00 388480 2335 361569 1% /home none 0 0 0 - /proc/sys/fs/binfmt_misc
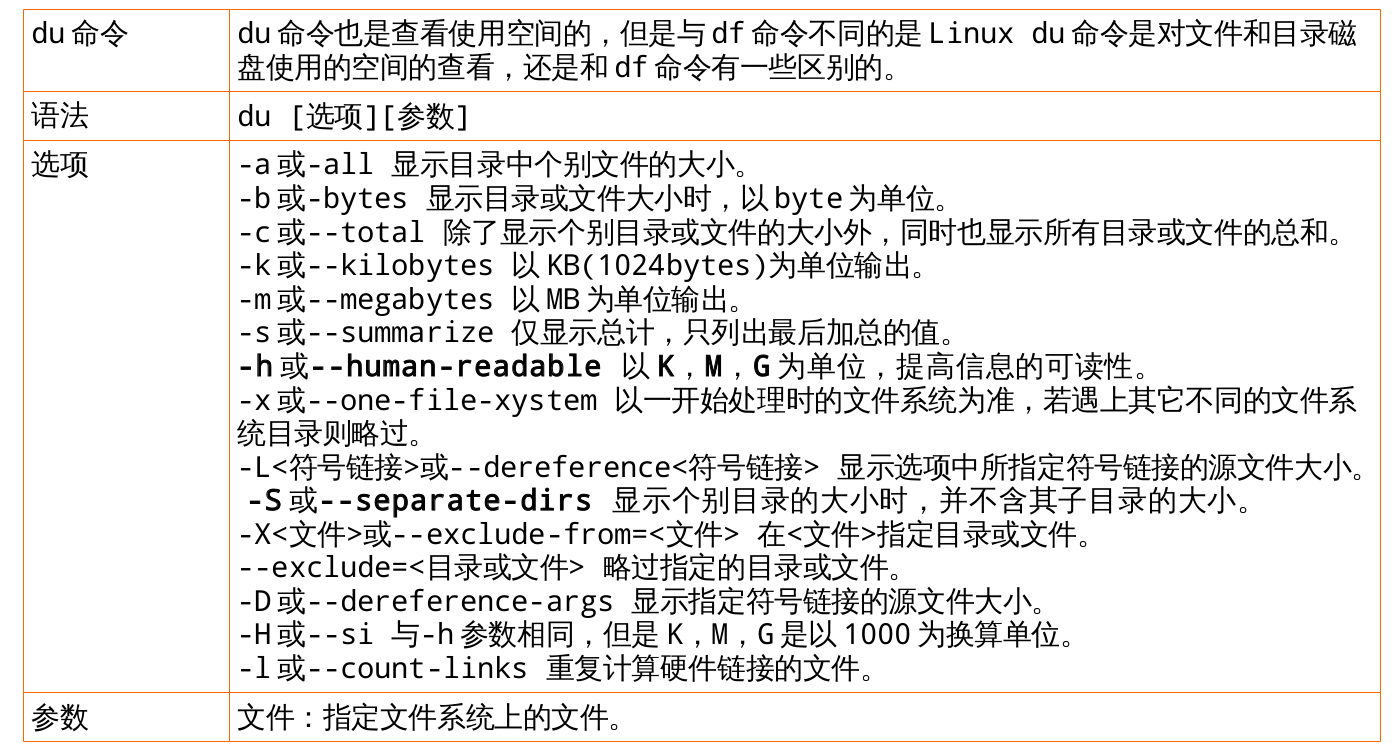
du
实例:
查看指定目录所占空间[# 9 140252 /var/ [# 10 137M /var/
查看指定目录下的所有文件,包括隐藏文件[# 16 8.0K /tmp/pulse-oCBy0hGD1JT6 4.0K /tmp/.X11-unix 4.0K /tmp/.esd-0 4.0K /tmp/virtual-root.JyC7Qb 8.0K /tmp/orbit-gdm 4.0K /tmp/.ICE-unix 8.0K /tmp/pulse-q5sECpImz7Ju 48K /tmp [# 15 4.0K /tmp/pulse-oCBy0hGD1JT6/pid 0 /tmp/pulse-oCBy0hGD1JT6/native 8.0K /tmp/pulse-oCBy0hGD1JT6 0 /tmp/.X11-unix/X0 4.0K /tmp/.X11-unix 0 /tmp/.esd-0/socket 4.0K /tmp/.esd-0 4.0K /tmp/virtual-root.JyC7Qb 4.0K /tmp/.X0-lock 0 /tmp/orbit-gdm/linc-6c2-0-7846478690c68 0 /tmp/orbit-gdm/bonobo-activation-register-75c59b1ecf3edd6ad04cfcfd00000056.lock 4.0K /tmp/orbit-gdm/bonobo-activation-server-75c59b1ecf3edd6ad04cfcfd00000056-ior 0 /tmp/orbit-gdm/linc-6e5-0-3bda60586d2f0 0 /tmp/orbit-gdm/linc-6bb-0-2bf2fd0bb015c 0 /tmp/orbit-gdm/linc-6e1-0-44f3459db98f9 0 /tmp/orbit-gdm/linc-6d9-0-26db8cdee8dec 0 /tmp/orbit-gdm/linc-6e0-0-7f7b8d4664593 0 /tmp/orbit-gdm/linc-6e4-0-540f978681aee 0 /tmp/orbit-gdm/linc-6d4-0-3a04cbe9566 0 /tmp/orbit-gdm/linc-6d5-0-75caf0f81ab48 8.0K /tmp/orbit-gdm 0 /tmp/.ICE-unix/1723 4.0K /tmp/.ICE-unix 4.0K /tmp/pulse-q5sECpImz7Ju/pid 0 /tmp/pulse-q5sECpImz7Ju/native 8.0K /tmp/pulse-q5sECpImz7Ju 48K /tmp
磁盘的分割、格式化与挂载 新增一颗硬盘时 , 该怎么做 :
对磁盘进行分割 , 以建立可用的分区 partition ;
对该 partition 进行格式化 ( format ), 以建立系统可用的文件系统 filesystem;
若想要仔细一点 , 则可对刚刚建立好的 filesystem 进行检验 ;
在 Linux 系统上 , 需要建立挂载点 ( 目录 ), 并将他挂载上来。
如果 ll /dev/ 新建的分区不存在,则使用 partx -a /dev/vdb 让新建的分区被读取生效,或者重启电脑
分割 fdisk fdisk命令用于观察硬盘实体使用情况,也可对硬盘分区。它采用传统的问答式界面。
语法 fdisk(选项)(参数)
选项
-b<分区大小>:指定每个分区的大小;
-l:列出指定的外围设备的分区表状况;
-s<分区编号>:将指定的分区大小输出到标准输出上,单位为区块;
-u:搭配”-l”参数列表,会用分区数目取代柱面数目,来表示每个分区的起始地址;
-v:显示版本信息。
参数 设备文件:指定要进行分区或者显示分区的硬盘设备文件。
[# 20 Disk /dev/vda: 21.5 GB, 21474836480 bytes 16 heads, 63 sectors/track, 41610 cylinders Units = cylinders of 1008 * 512 = 516096 bytes Sector size (logical/physical): 512 bytes / 512 bytes I/O size (minimum/optimal): 512 bytes / 512 bytes Disk identifier: 0x000d166b Device Boot Start End Blocks Id System /dev/vda1 * 3 1018 512000 83 Linux Partition 1 does not end on cylinder boundary. /dev/vda2 1018 5179 2097152 82 Linux swap / Solaris Partition 2 does not end on cylinder boundary. /dev/vda3 5179 41611 18361344 8e Linux LVM Partition 3 does not end on cylinder boundary. Disk /dev/vdb: 10.7 GB, 10737418240 bytes 16 heads, 63 sectors/track, 20805 cylinders Units = cylinders of 1008 * 512 = 516096 bytes Sector size (logical/physical): 512 bytes / 512 bytes I/O size (minimum/optimal): 512 bytes / 512 bytes Disk identifier: 0x00000000 Disk /dev/mapper/vg_rhel6-LogVol01: 18.4 GB, 18379440128 bytes 255 heads, 63 sectors/track, 2234 cylinders Units = cylinders of 16065 * 512 = 8225280 bytes Sector size (logical/physical): 512 bytes / 512 bytes I/O size (minimum/optimal): 512 bytes / 512 bytes Disk identifier: 0x00000000 Disk /dev/mapper/vg_rhel6-LogVol00: 419 MB, 419430400 bytes 255 heads, 63 sectors/track, 50 cylinders Units = cylinders of 16065 * 512 = 8225280 bytes Sector size (logical/physical): 512 bytes / 512 bytes I/O size (minimum/optimal): 512 bytes / 512 bytes Disk identifier: 0x00000000 [# 21 Device contains neither a valid DOS partition table, nor Sun, SGI or OSF disklabel Building a new DOS disklabel with disk identifier 0x23c41712. Changes will remain in memory only, until you decide to write them. After that, of course, the previous content won't be recoverable. Warning: invalid flag 0x0000 of partition table 4 will be corrected by w(rite) WARNING: DOS-compatible mode is deprecated. It's strongly recommended to switch off the mode (command 'c') and change display units to sectors (command 'u'). Command (m for help): m <== 输入 m 后 , 就会看到底下这些指令介绍 Command action a toggle a bootable flag b edit bsd disklabel c toggle the dos compatibility flag d delete a partition <== 删除一个分区 l list known partition types m print this menu n add a new partition <== 新增一个分区 o create a new empty DOS partition table p print the partition table== 在屏幕上显示分割表 q quit without saving changes<== 不储存离开 fdisk 程序 s create a new empty Sun disklabel t change a partition's system id u change display/entry units v verify the partition table w write table to disk and exit<== 将刚刚的动作写入分割表 x extra functionality (experts only) Command (m for help): p Disk /dev/vdb: 10.7 GB, 10737418240 bytes 16 heads, 63 sectors/track, 20805 cylinders Units = cylinders of 1008 * 512 = 516096 bytes Sector size (logical/physical): 512 bytes / 512 bytes I/O size (minimum/optimal): 512 bytes / 512 bytes Disk identifier: 0x23c41712 Device Boot Start End Blocks Id System Command (m for help): n Command action e extended p primary partition (1-4) p Partition number (1-4): 1 First cylinder (1-20805, default 1): Using default value 1 Last cylinder, +cylinders or +size{K,M,G} (1-20805, default 20805): Using default value 20805 Command (m for help): p Disk /dev/vdb: 10.7 GB, 10737418240 bytes 16 heads, 63 sectors/track, 20805 cylinders Units = cylinders of 1008 * 512 = 516096 bytes Sector size (logical/physical): 512 bytes / 512 bytes I/O size (minimum/optimal): 512 bytes / 512 bytes Disk identifier: 0x23c41712 Device Boot Start End Blocks Id System /dev/vdb1 1 20805 10485688+ 83 Linux Command (m for help): w The partition table has been altered! Calling ioctl() to re-read partition table. Syncing disks. [# 22 vdb vdb1 [root@rhel7 ~]# fdisk /dev/vdb Welcome to fdisk (util-linux 2.23.2). Changes will remain in memory only, until you decide to write them. Be careful before using the write command. Device does not contain a recognized partition table Building a new DOS disklabel with disk identifier 0x8366bb08. Command (m for help): p Disk /dev/vdb: 10.7 GB, 10737418240 bytes, 20971520 sectors Units = sectors of 1 * 512 = 512 bytes Sector size (logical/physical): 512 bytes / 512 bytes I/O size (minimum/optimal): 512 bytes / 512 bytes Disk label type: dos Disk identifier: 0x8366bb08 Device Boot Start End Blocks Id System Command (m for help): n Partition type: p primary (0 primary, 0 extended, 4 free) e extended Select (default p): p Partition number (1-4, default 1): 1 First sector (2048-20971519, default 2048): Using default value 2048 Last sector, +sectors or +size{K,M,G} (2048-20971519, default 20971519): Using default value 20971519 Partition 1 of type Linux and of size 10 GiB is set Command (m for help): p Disk /dev/vdb: 10.7 GB, 10737418240 bytes, 20971520 sectors Units = sectors of 1 * 512 = 512 bytes Sector size (logical/physical): 512 bytes / 512 bytes I/O size (minimum/optimal): 512 bytes / 512 bytes Disk label type: dos Disk identifier: 0x8366bb08 Device Boot Start End Blocks Id System /dev/vdb1 2048 20971519 10484736 83 Linux Command (m for help): w The partition table has been altered! Calling ioctl() to re-read partition table. Syncing disks.
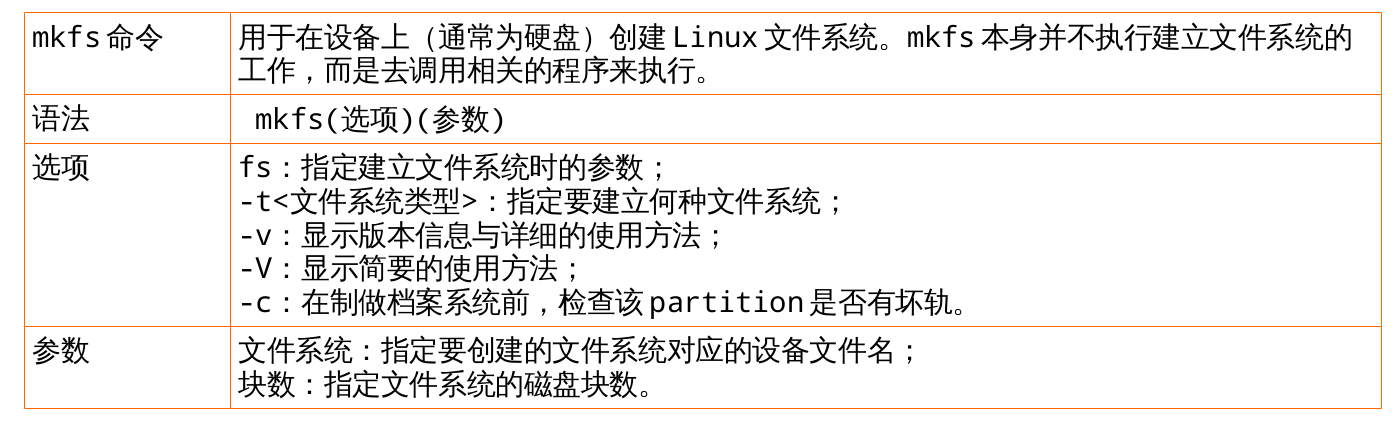
磁盘格式化 mkfs
rhel6实例:查看支持的文件系统;将/dev/vdb1格式化成ext4文件系统
[# 23 mkfs mkfs.cramfs mkfs.ext2 mkfs.ext3 mkfs.ext4 mkfs.ext4dev mkfs.msdos mkfs.vfat [# 24 mke2fs 1.41.12 (17-May-2010) Filesystem label= OS type: Linux Block size=4096 (log=2) Fragment size=4096 (log=2) Stride=0 blocks, Stripe width=0 blocks 655360 inodes, 2621422 blocks 131071 blocks (5.00%) reserved for the super user First data block=0 Maximum filesystem blocks=2684354560 80 block groups 32768 blocks per group, 32768 fragments per group 8192 inodes per group Superblock backups stored on blocks: 32768, 98304, 163840, 229376, 294912, 819200, 884736, 1605632 Writing inode tables: done Creating journal (32768 blocks): done Writing superblocks and filesystem accounting information: done This filesystem will be automatically checked every 38 mounts or 180 days, whichever comes first. Use tune2fs -c or -i to override.
rhel7实例:查看支持的文件系统;将/dev/vdb1格式化成xfs文件系统
[root@rhel7 ~]# mkfs
mkfs         mkfs.cramfs  mkfs.ext3    mkfs.fat     mkfs.msdos   mkfs.xfs
mkfs.btrfs   mkfs.ext2    mkfs.ext4    mkfs.minix   mkfs.vfat
[root@rhel7 ~]# mkfs.xfs /dev/vdb1
meta-data=/dev/vdb1              isize=256    agcount=4, agsize=655296 blks
         =                       sectsz=512   attr=2, projid32bit=1
         =                       crc=0
data     =                       bsize=4096   blocks=2621184, imaxpct=25
         =                       sunit=0      swidth=0 blks
naming   =version 2              bsize=4096   ascii-ci=0 ftype=0
log      =internal log           bsize=4096   blocks=2560, version=2
         =                       sectsz=512   sunit=0 blks, lazy-count=1
realtime =none                   extsz=4096   blocks=0, rtextents=0
挂载 /etc/fstab
/etc/filesystems: 系统指定的测试挂载文件系统类型 ;
/proc/filesystems:Linux 系统已经加载的文件系统类型。
mount 的用法 1) 标准用法 mount -t ext4 /dev/vdb1 /mnt/vdb1
2) 远程挂载 mount ip:/xx /xx
`mount 172.25.254.250 : /content /mnt` <== 远程挂载案例
3) 其他选项:
A.-o loop 挂载镜像文件
用法: mount -o loop 被挂载的文件 挂载点
例如: mount -o loop rhel-server-6.5-x86_64-dvd.iso /test
B.-o ro 以只读方式挂载
用法: mount -o ro 被挂在的设备 挂载点
例如: mount -o ro /dev/vdb1 /test
C.-o remount 重新挂载
用法: mount -o remount 被挂载的设备 挂载点
例如: mount -o remount,rw,auto / <== 重新挂载根目录
mount -o remount,ro newdir <== 重新挂载为只读
D.-t iso9660 挂载CD/DVD
用法: mount -t iso9660 被挂载的设备 挂载点
例如: mount -t iso9660 /dev/dvdrom /media/dvdrom
mount 的查看 df -h
mount <== 查看设备和目录挂载点的关系[# 27 /dev/mapper/vg_rhel6-LogVol01 on / type ext4 (rw) proc on /proc type proc (rw) sysfs on /sys type sysfs (rw) devpts on /dev/pts type devpts (rw,gid=5,mode=620) tmpfs on /dev/shm type tmpfs (rw,rootcontext="system_u:object_r:tmpfs_t:s0") /dev/vda1 on /boot type ext4 (rw) /dev/mapper/vg_rhel6-LogVol00 on /home type ext4 (rw) none on /proc/sys/fs/binfmt_misc type binfmt_misc (rw)
umount umount [-fn] 设备文件名与挂载点
umount /mnt
注意事项:
对某个挂载点使用多次 mount ,会把之前的内容隐藏起来,只能看到最后一次挂载的设备文件里的内容
不要在挂载点里面执行 umount 命令,会报错
尽量不要在挂载点里执行 mount 挂载命令
mount 命令为临时生效
/etc/fstab 将永久生效
是否需要检测:非 0 代表检测,数字越小优先级越高
修改后保存,通过 mount -a让配置生效
磁盘配额 Quota 如前面介绍章节讲到的类 Unix 系统最初设计理念就让许多人一起使用,多任务的操作系统,但是硬件的资源是固定有限 的,如果出现个小破坏份子不断的创建文件或下载电影,那么硬盘空间总有一天会被占满的吧,这时就需要 quota服务 帮助我们为每个用户限制可以使用的硬盘空间,一旦超出预算就不再允许他们使用。
作用和分类 quota 的磁盘配额可以限制用户的硬盘可用空间或最大创建文件数量,并且还有软/硬限制的区别:
软限制:当达到软限制时会提示用户,但允许用户在规定期限内继续使用。
硬限制:当达到硬限制时会提示用户,且强制终止用户的操作。
相关命令 quotacheck quotacheck命令通过扫描指定的文件系统,获取磁盘的使用情况,创建、检查和修复磁盘配额(quota)文件。执行quotacheck指令,扫描挂入系统的分区,并在各分区的文件系统根目录下产生quota.user和quota.group文件,设置用户和群组的磁盘空间限制。
语法 quotacheck(选项)(参数)
选项
-a:扫描在/etc/fstab文件里,有加入quota设置的分区;
-d:详细显示指令执行过程,便于排错或了解程序执行的情形;
-g:扫描磁盘空间时,计算每个群组识别码所占用的目录和文件数目;
-R:排除根目录所在的分区;
-u:扫描磁盘空间时,计算每个用户识别码所占用的目录和文件数目;
-v:显示指令执行过程。
参数 文件系统:指定要扫描的文件系统。
quota quota命令用于显示用户或者工作组的磁盘配额信息。输出信息包括磁盘使用和配额限制。
语法 quota(选项)(参数)
选项
-g:列出群组的磁盘空间限制;
-q:简明列表,只列出超过限制的部分;
-u:列出用户的磁盘空间限制;
-v:显示该用户或群组,在所有挂入系统的存储设备的空间限制;
-V:显示版本信息。
参数 用户或者工作组:指定要显示的用户或者工作组。
quotaon quotaon命令用于激活Linux内核中指定文件系统的磁盘配额功能。
语法 quotaon(选项)(参数)
选项
-a:开启在/ect/fstab文件里,有加入quota设置的分区的空间限制;
-g:开启群组的磁盘空间限制;
-u:开启用户的磁盘空间限制;
-v:显示指令指令执行过程。
参数 文件系统:指定要激活磁盘配额功能的文件系统。
repquota repquota命令以报表的格式输出指定分区,或者文件系统的磁盘配额信息。
语法 repquota(选项)(参数)
选项
-a:列出在/etc/fstab文件里,有加入quota设置的分区的使用状况,包括用户和群组;
-g:列出所有群组的磁盘空间限制;
-u:列出所有用户的磁盘空间限制;
-v:显示该用户或群组的所有空间限制。
参数 文件系统:要打印报表的文件系统或者对应的设备文件名。
edquota edquota 命令用于超级用户编辑其他用户的 quota 配额限制
格式为: “ edquota [参数] [用户]”。
参数 作用
-u 编辑用户的配额限制。
-g 编辑用户组的配额限制。
-r 通过 RPC 协议编辑远程的配额。
xfs_quota xfs_quota 命令用于管理 XFS 文件系统的 quota 硬盘配额
格式为: “ quota [参数] 配额 文件系统 ” 。
参数 作用
-c 命令 以交换式或参数的形式设置要执行的命令。
-p 设置提示或报错信息的程序名称,默认为 xfs_quota。
-x 专家模式,能够对 quota 做更多复杂的配置。
实验 rhel6 quota实验 划分分区/dev/vdb2,格式化成ext4文件系统,并挂载在student家目录下使用,限制磁盘软限制为 3M、磁盘硬限制为 6M、文件软限制为 20 个且文件硬限制为 30 个
挂载时需要加上 -o usrquota,grpquota 选项 :mount -o usrquota,grpquota /dev/vdb2 /home/student
/etc/skel 需要的文件需要复制到家目录下 :cp .bash* .gnome2 .mozilla -r /home/student
修改家目录权限 :chown student.student /home/student ;setenforce 0
检测:quotacheck -cugm /home/student/ 检测结果 : aquota.group aquota.user <== 只有 root 用户有读写权限
激活 :quotaon /home/student
打印磁盘配额的报告 :repquota /home/student
编辑edquota student
[root@rhel6 ~]# mount -o usrquota,grpquota /dev/vdb2 /home/student
[root@rhel6 ~]# ll /home/student
total 16
drwx------. 2 root root 16384 Jul  1 15:56 lost+found
[root@rhel6 ~]# cd /etc/skel
[root@rhel6 skel]# cp .bash* .gnome* .moz* -r /home/student
[root@rhel6 skel]# ll /home/student -a
total 42
drwxr-xr-x. 5 root root  4096 Jul  1 16:00 .
drwxr-xr-x. 4 root root  1024 Jul  2  2015 ..
-rw-r--r--. 1 root root    18 Jul  1 16:00 .bash_logout
-rw-r--r--. 1 root root   176 Jul  1 16:00 .bash_profile
-rw-r--r--. 1 root root   124 Jul  1 16:00 .bashrc
drwxr-xr-x. 2 root root  4096 Jul  1 16:00 .gnome2
drwx------. 2 root root 16384 Jul  1 15:56 lost+found
drwxr-xr-x. 4 root root  4096 Jul  1 16:00 .mozilla
[root@rhel6 skel]# chown student. /home/student -R
[root@rhel6 skel]# setenforce 0
[root@rhel6 skel]# quotacheck -cugm /home/student
[root@rhel6 skel]# ll /home/student
total 32
-rw-------. 1 root    root     6144 Jul  1 16:03 aquota.group
-rw-------. 1 root    root     6144 Jul  1 16:03 aquota.user
drwx------. 2 student student 16384 Jul  1 15:56 lost+found
[root@rhel6 skel]# quotaon /home/student
[root@rhel6 skel]# repquota /home/student
*** Report for user quotas on device /dev/vdb2
Block grace time: 7days; Inode grace time: 7days
                        Block limits                File limits
User            used    soft    hard  grace    used  soft  hard  grace
----------------------------------------------------------------------
student   --      48       0       0              9     0     0


[root@rhel6 skel]# edquota student
edquota: WARNING - /dev/vdb2: cannot change current inode allocation
[root@rhel6 skel]# edquota student
[root@rhel6 skel]# repquota /home/student
*** Report for user quotas on device /dev/vdb2
Block grace time: 7days; Inode grace time: 7days
                        Block limits                File limits
User            used    soft    hard  grace    used  soft  hard  grace
----------------------------------------------------------------------
student   -+      48    3072    6144              9     3     6  7days


[root@rhel6 skel]# quota student
Disk quotas for user student (uid 500):
     Filesystem  blocks   quota   limit   grace   files   quota   limit   grace
      /dev/vdb2      48    3072    6144               9*      3       6   7days
[root@rhel6 skel]# su - student
[student@rhel6 ~]$ touch file{1..10}
vdb2: write failed, user file limit reached.
touch: cannot touch `file1': Disk quota exceeded
touch: cannot touch `file2': Disk quota exceeded
touch: cannot touch `file3': Disk quota exceeded
touch: cannot touch `file4': Disk quota exceeded
touch: cannot touch `file5': Disk quota exceeded
touch: cannot touch `file6': Disk quota exceeded
touch: cannot touch `file7': Disk quota exceeded
touch: cannot touch `file8': Disk quota exceeded
touch: cannot touch `file9': Disk quota exceeded
touch: cannot touch `file10': Disk quota exceeded
rhel7 quota实验 root用户:
查看内核是否支持 quota 功能: dmesg | grep quota
查看 quota 程序包是否已经安装: rpm -q quota
查看 boot 目录是否支持 quota 功能(noquota 表示暂时不支持): mount|grep boot
让/boot 目录支持 quota 功能: vim /etc/fstab 属性中添加usrquota
重启主机后即可生效: reboot
查看 boot 目录是否支持 quota 功能(usrquota 表示已经支持): mount|grep boot
创建一个用于 quota 实验的用户 tom: useradd tom && echo uplooking|passwd tom
需要允许其他用户对/boot 目录写入文件操作: chmod -Rf o+w /boot
使用 xfs_quota 命令设置对 tom 用户在/boot 目录的磁盘配额,具体要求如下:
xfs_quota -x -c 'limit bsoft=3m bhard=6m isoft=3 ihard=6 tom' /boot
xfs_quota -x -c report /boot
切换至 tom 用户: su - tom
正常创建了一个为 5M 的文件: dd if=/dev/zero of=/boot/tom bs=5M count=1
创建 8M 文件时强制终止并报错了: dd if=/dev/zero of=/boot/tom bs=8M count=1
查看当前用户的 quota 限制(显示硬盘配额已占满): quota
切换至root用户:exit
编辑 tom 的配额限制,将硬盘的硬限制修改为 8m(8192k): edquota -u tom
切换至 tom 用户: su - tom
再来创建 8m 的文件就不会有问题了: dd if=/dev/zero of=/boot/tom bs=8M count=1
[root@rhel7 ~]# dmesg|grep quota
[    0.836809] VFS: Disk quotas dquot_6.5.2
[root@rhel7 ~]# rpm -q quota
quota-4.01-11.el7.x86_64
[root@rhel7 ~]# mount|grep boot
/dev/vda1 on /boot type xfs (rw,relatime,seclabel,attr2,inode64,noquota)
[root@rhel7 ~]# vim /etc/fstab
UUID=abbadca9-0a0d-453f-b713-d3d978cd6909 /boot                   xfs     defaults,usrquota        1 2
[root@rhel7 ~]# reboot
[root@rhel7 ~]# mount|grep boot
/dev/vda1 on /boot type xfs (rw,relatime,seclabel,attr2,inode64,usrquota)
[root@rhel7 ~]# useradd tom
[root@rhel7 ~]# passwd tom
Changing password for user tom.
New password:
BAD PASSWORD: The password fails the dictionary check - it is based on a dictionary word
Retype new password:
passwd: all authentication tokens updated successfully.
[root@rhel7 ~]# chmod -Rf o+w /boot
[root@rhel7 ~]# ll -d /boot
dr-xr-xrwx. 3 root root 4096 Jun 27 03:59 /boot
[root@rhel7 ~]# xfs_quota -x -c 'limit bsoft=3m bhard=6m isoft=3 ihard=6 tom' /boot
[root@rhel7 ~]# xfs_quota -x -c report /boot
User quota on /boot (/dev/vda1)
                               Blocks
User ID          Used       Soft       Hard    Warn/Grace
---------- --------------------------------------------------
root           120384          0          0     00 [--------]
tom                 0       3072       6144     00 [--------]

[root@rhel7 ~]# su - tom
Last login: Fri Jul  1 02:51:33 EDT 2016 on pts/0
[tom@rhel7 ~]$ dd if=/dev/zero of=/boot/tom bs=5M count=1
1+0 records in
1+0 records out
5242880 bytes (5.2 MB) copied, 0.0270144 s, 194 MB/s
[tom@rhel7 ~]$ dd if=/dev/zero of=/boot/tom bs=8M count=1
dd: error writing ‘/boot/tom’: Disk quota exceeded
1+0 records in
0+0 records out
6291456 bytes (6.3 MB) copied, 0.218067 s, 28.9 MB/s
[tom@rhel7 ~]$ quota
Disk quotas for user tom (uid 1001):
     Filesystem  blocks   quota   limit   grace   files   quota   limit   grace
      /dev/vda1    6144*   3072    6144   6days       1       3       6
[tom@rhel7 ~]$ exit
logout
[root@rhel7 ~]# edquota -u tom
Disk quotas for user tom (uid 1001):
  Filesystem                   blocks       soft       hard     inodes     soft     hard
  /dev/vda1                      8192       3072       8192          1        3        6
[root@rhel7 ~]# xfs_quota -x -c report /boot
User quota on /boot (/dev/vda1)
                               Blocks
User ID          Used       Soft       Hard    Warn/Grace
---------- --------------------------------------------------
root           120384          0          0     00 [--------]
tom              6144       3072       8192     00  [6 days]

[root@rhel7 ~]# su - tom
Last login: Fri Jul  1 02:58:22 EDT 2016 on pts/0
[tom@rhel7 ~]$ dd if=/dev/zero of=/boot/tom bs=8M count=1
1+0 records in
1+0 records out
8388608 bytes (8.4 MB) copied, 0.267325 s, 31.4 MB/s
[tom@rhel7 ~]$ exit
logout
逻辑卷管理 LVM 逻辑卷管理 (Logical Volume Manager)
作用 当用户根据实际情况需要对分区增加、减小等调整时,经常会受到硬盘 “ 灵活性 ” 的限制,很不方便。
逻辑卷管理器则是在磁盘分区与文件系统之间添加的逻辑层,提供一个抽象的卷组,使得管理者可以忽略底层磁盘布局, 从而实现对分区的灵活动态调整,这毫不夸张,所以红帽 RHEL7 系统已经默认启用了 LVM(Logical Volume Manager) 机制。
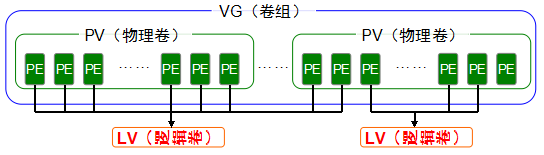
原理
将物理分区做成 pv ;将 pv 组合成 vg ;再从 vg 分出 lv 分区 —>pv—>vg—>lv
物理卷(PV,Physical Volume ): 整个硬盘设备或使用 fdisk 命令建立的硬盘分区。
卷组(VG,Volume Group ) :由一个或多个物理卷(PV)组成的整体
逻辑卷(LV,Logical Volume ):从卷组(VG)出切割出的空间来用于创建文件系统,大小由 PE 的个数决定。
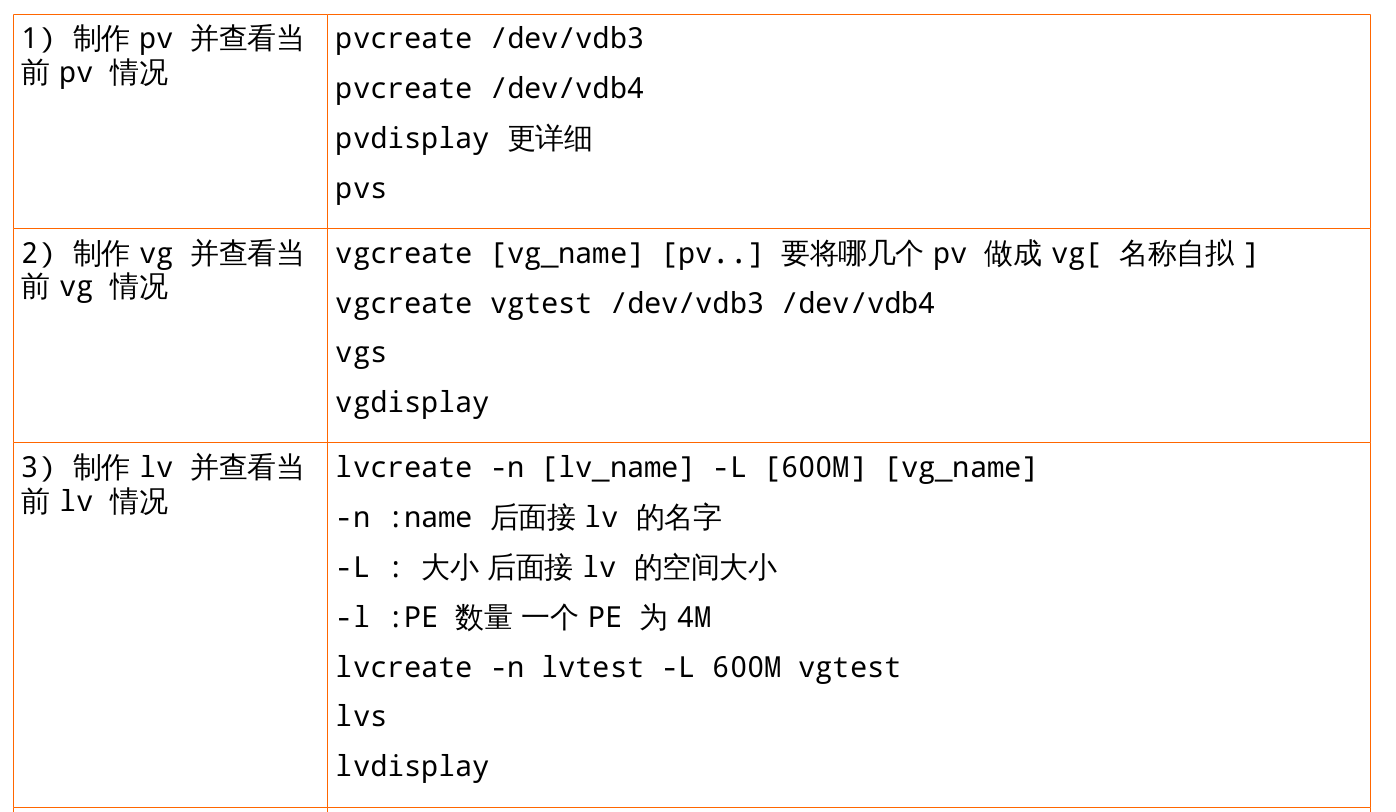
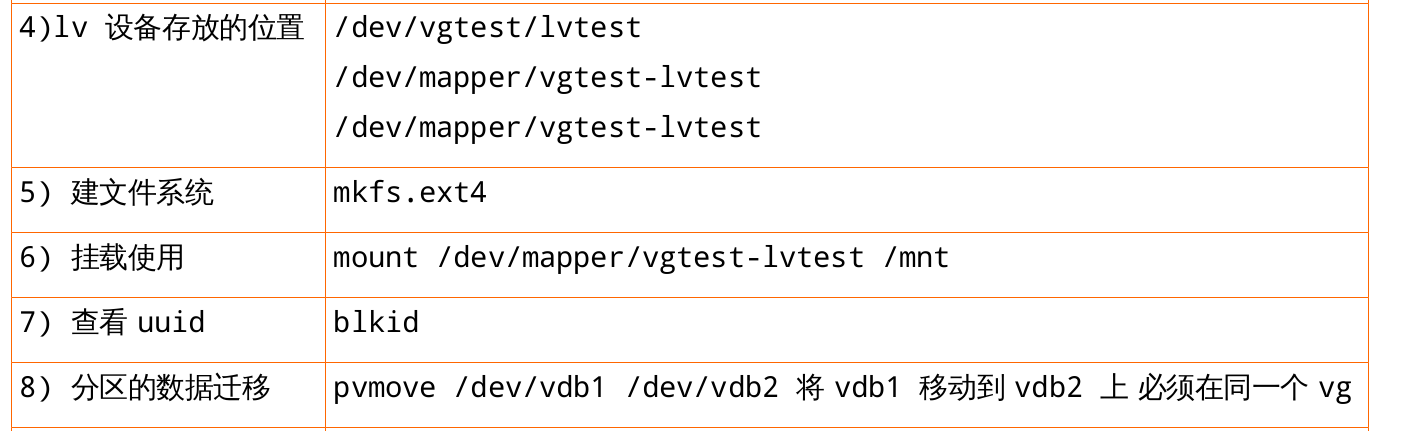
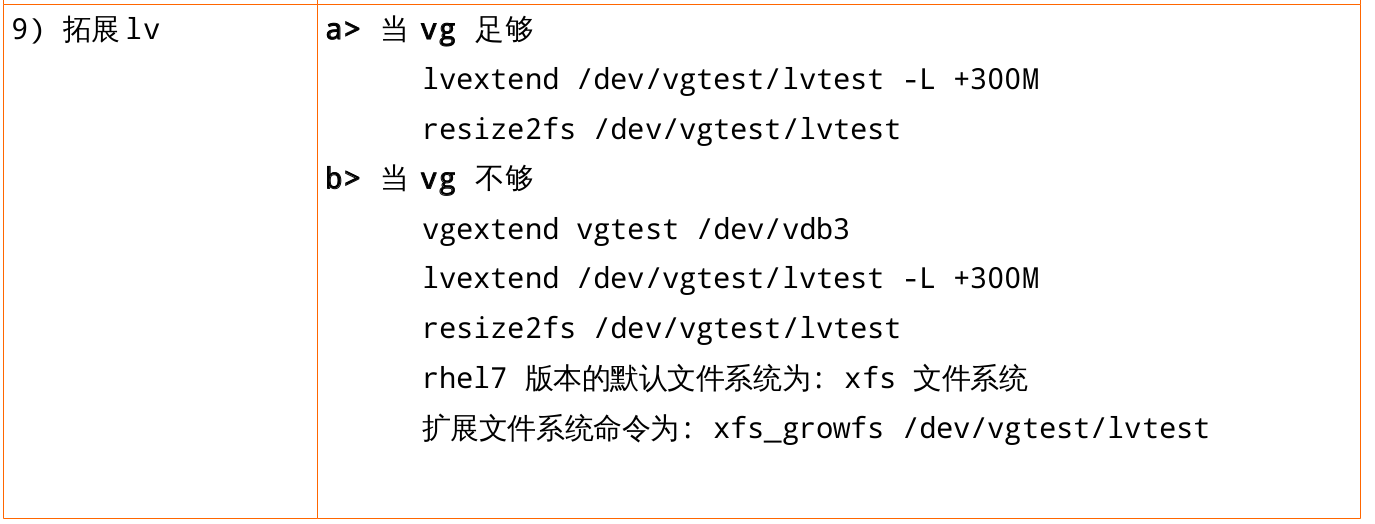
步骤
实验 实验:linear 目前用户的映射目标为linear型,线性型,/dev/vdb1 pv1 100M;/dev/vdb2 pv2 100M;/dev/vdb3 pv 3 100M——->myvg 300M——->lv1-linear 20M;lv2-linear 60M现在lv1-linear不够用了,需要拓展60M的空间,lv2-linear也不够用了,需要拓展30M的空间,如何做才能提高读写速度?
root@iscsi1-f15 ~]# dmsetup table|grep my
myvg-lv1--linear: 0 40960 linear 252:21 2048
myvg-lv1--linear: 40960 32768 linear 252:21 165888
myvg-lv1--linear: 73728 90112 linear 252:22 2048
myvg-lv2--linear: 0 122880 linear 252:21 43008
myvg-lv2--linear: 122880 65536 linear 252:22 92160
–------------------------------------------------------------------------
[root@iscsi1-f15 ~]# dmsetup table|grep myvg
myvg-lv1--linear: 0 73728 linear 252:25 2048
myvg-lv1--linear: 73728 90112 linear 252:25 75776
myvg-lv2--linear: 0 122880 linear 252:25 165888
myvg-lv2--linear: 122880 65536 linear 252:25 288768
[root@iscsi1-f15 ~]# fdisk /dev/vdb --->vdb[123] 100M
[root@iscsi1-f15 ~]# pvcreate /dev/vdb[123]
[root@iscsi1-f15 ~]# vgcreate myvg /dev/vdb[123]
[root@iscsi1-f15 ~]# lvcreate -L 20M myvg -n lv1-linear
[root@iscsi1-f15 ~]# lvcreate -L 60M myvg -n lv2-linear
[root@iscsi1-f15 ~]# mkfs.ext4 /dev/myvg/lv1-linear
[root@iscsi1-f15 ~]# mkfs.ext4 /dev/myvg/lv2-linear
[root@iscsi1-f15 ~]# mount /dev/myvg/lv1-linear /opt/lv1
[root@iscsi1-f15 ~]# mount /dev/myvg/lv2-linear /opt/lv2
[root@iscsi1-f15 ~]# lvextend -L +60M /dev/myvg/lv1-linear
[root@iscsi1-f15 ~]# lvextend -L +30M /dev/myvg/lv2-linear
[root@iscsi1-f15 ~]# resize2fs /dev/myvg/lv1-linear
[root@iscsi1-f15 ~]# resize2fs /dev/myvg/lv2-linear
[root@iscsi1-f15 ~]# dmsetup table|grep my
myvg-lv1--linear: 0 40960 linear 252:21 2048
myvg-lv1--linear: 40960 32768 linear 252:21 165888
myvg-lv1--linear: 73728 90112 linear 252:22 2048
myvg-lv2--linear: 0 122880 linear 252:21 43008
myvg-lv2--linear: 122880 65536 linear 252:22 92160
–------------------------------------------------------------------------
[root@iscsi1-f15 ~]# fdisk /dev/vdb --->vdb4 500M vdb5 500M
[root@iscsi1-f15 ~]# partx -a /dev/vdb
[root@iscsi1-f15 ~]# pvcreate /dev/vdb[45]
[root@iscsi1-f15 ~]# vgextend myvg /dev/vdb[45]
[root@iscsi1-f15 ~]# pvmove /dev/vdb1 /dev/vdb4
[root@iscsi1-f15 ~]# pvmove /dev/vdb2 /dev/vdb4
[root@iscsi1-f15 ~]# pvmove /dev/vdb4 /dev/vdb5
[root@iscsi1-f15 ~]# dmsetup table|grep myvg
myvg-lv1--linear: 0 73728 linear 252:25 2048
myvg-lv1--linear: 73728 90112 linear 252:25 75776
myvg-lv2--linear: 0 122880 linear 252:25 165888
myvg-lv2--linear: 122880 65536 linear 252:25 288768
Linux文件系统和磁盘管理作业
分别在rhel6和rhel7上划分/dev/vdb磁盘,要求,/dev/vdb1大小为1G,/dev/vdb2大小为2G;创建对应操作系统默认的文件系统,rhel6默认ext4,rhel7默认xfs。
rhel6上将/dev/vdb2挂载在student家目录下使用,限制磁盘软限制为 3M、磁盘硬限制为 6M、文件软限制为 20 个且文件硬限制为 30 个
rhel7上完成: 1. 查看内核是否支持 quota 功能: 2. 查看 quota 程序包是否已经安装: 3. 查看 boot 目录是否支持 quota 功能(noquota 表示暂时不支持): 4. 让/boot 目录支持 quota 功能: 5. 重启主机后即可生效: 6. 查看 boot 目录是否支持 quota 功能(usrquota 表示已经支持): 7. 创建一个用于 quota 实验的用户 tom: 8. 需要允许其他用户对/boot 目录写入文件操作: 9. 使用 xfs_quota 命令设置对 tom 用户在/boot 目录的磁盘配额,具体要求如下: 使用 quota 专家模式限制磁盘软限制为 3m、磁盘硬限制为 6m、文件软限制为 3 个且文件硬限制为 6 个。 获取当前/boot 目录上的 quota 配额限制
正常创建了一个为 5M 的文件:
创建 8M 文件时强制终止并报错了:
查看当前用户的 quota 限制(显示硬盘配额已占满):
切换至root用户:
编辑 tom 的配额限制,将硬盘的硬限制修改为 8m(8192k):
切换至 tom 用户:
1. 再来创建 8m 的文件就不会有问题了:
rhel6和rhel7上完成lvm逻辑卷管理,要求:1)/dev/vdb1 100M;/dev/vdb2 100M;/dev/vdb3 100M;/dev/vdb4 100M 2) 将/dev/vdb[1,2,3,4]做成pv 3)/dev/vdb1,/dev/vdb2组成vgtest300M 4)从vgtest中划分50M的lvtest1 5)将lvtest1挂载到/mnt下使用 6)拓展lvtest1至200M 7)拓展lvtest1至400M 8)缩小lvtest1至50M